骨組が終った後は、足場作りをしなければいけない。屋根屋のNさんが使ってない足場を貸してくれると言ってくれたので、遠慮なくお借りすることにした。

ついでに、余ったヒノキの破材もあるから使っていいと言われて、これもまた遠慮なくもらいました。

まだブログに書いていなかったかもしれないけど、今回のキャビンはなるべく廃材を使って建てようというテーマがある。建築産業からでる廃材の量はかなり半端ない。アメリカではゴミの40%くらいが建築産業からでるゴミから出るというのも読んだ事がある。廃材といっても、けして使えないものでない。ちょっと傷がついたものとか、木材を切ったあとの残る部分とか、単純に余るもの。全部特に問題ないものだけど、基本的に新築する時はみんな新品がいい訳で、小さく余ったものは使うのに手間が掛かるから使わない。もちろん工務店の人たちもこういうものを捨てるのももったいないと思うから、結構倉庫の中に使われないままおいてある。だから、使ってほしいと言ってくれるし、こっちとしてもすごくありがたい話になる。エコの家を建てるというテーマで考えても、ゴミになる物を使うというのは、だれでもできる事だし、一番無駄と無理がない気もする。
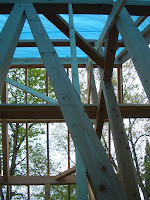
足場を組んだ後は、大工さんたちが屋根の工事を始めて(私も一回屋根に上ったけど、かなり怖かった・・・)私達は筋交いの作業を教えてもらって、それに取り組んだ。写真のように、柱の間に斜めに筋交いを入れていく。これがちょうどはまるように計るには、筋交いを入れる枠の縦と横の高さを測って、その比率で切る角度を決める。

たとえば、230cmと80cmだったら、サジガネ(直角定規)を使って、23cmと8cmを直角に測って8cmのラインを一直線に書いてから、そのラインの真ん中から、また直角にラインを書く。よく分からない説明になちゃったけど、まー実際にやってみないとこういうのは分からんものだ。


ちょうどフィットする(はず)の筋交いを入れて、ビスで固定したら、筋交いを支える間柱を作る。間柱をキャビンの周りの45cm単位で入れていくんだけど、筋交いがあるところには、筋交いが邪魔で入れられない。だから、筋交いが間柱を通るところを切らないといけない。これは単純に間柱を一回入るところまでいれて、筋交いにあたるところを鉛筆で線を書く。その線を筋交いの太さ分切って、これもまたちょうどフィットするようになる(はず)。この間柱の真ん中を丸ノコで切るのがなかなか最初は難しかった。あとは、間柱の上の部分が梁や桁に差し込めるように3cm角の突起状に加工する。

テトリスのようなもんですな。最終的にこんな感じにぜんぶ収まる。

この作業をキャビンの窓や扉が入らない場所全部やるから、3日くらいこの作業に費やした。次の作業は窓枠作り。お楽しみに!
Before moving on with the construction of the walls, we had to put up the footings (not sure what its called officially). This is so we will be able to reach the higher parts of the outer walls as we work. Mr. N, who will be doing our roof kindly let us borrow the parts for the footings and while we were at his warehouse, he also said he has some nice quality wood pieces that can be used for the inside walls. Although they are small pieces, their quality is fine and since he has no use for them, he said we can have it for free. So, of course we piled those in the truck and took it back with us as well.
Although I haven't mentioned it yet, we are trying to use as much recycled material and/or materials that would otherwise be considered garbage. Lots of materials go to waste in the construction business, not because they are unusable, but simply because they have a slight stain or scratch, or are basically just left over from the construction site. And, of course, since most people don't want their house built from left over material and also because its probably more work than its worth for the construction workers to collect and use left over parts, everything is bought new and in bulk. So, the warehouses of these construction companies are filled with usable materials that they feel bad about throwing out since its usable, but also can't use for their new projects. They are happy that we can get it off their hands, and we are super happy since we get materials for dirt cheap or free. I once read that the amount of garbage that comes from the construction business is about 40% of the total garbage produced in a year in the US. So, if we can make use of these materials that will otherwise just be thrown out, it is both ecological and it keeps our purses happy.
After we put up the footings, the carpenters worked on the roof (I went up on the roof once, and it was quite scary so we will leave that to the professionals) and they taught us how to make the rest of the walls. Like I mentioned before, we are using Japanese style building methods, and with this style, we put in wooden post sideways to fit exactly between the posts to strengthen the walls. Once one goes in sideways, we also put another post in the middle (this kind of post will go up every 45cm of the walls), so the sideways post is now in the way, so we have to measure and cut the middle of the rod, so the sideways one once again fits exactly inside the middle rod. Its kinda hard to explain, but the pictures should make it clearer. The top of the middle rod is cut into a 3cm square and this fits exactly in a hole that was made earlier on top. Technically, everything is supposed to fit snugly together so in the past they didn't have to use nails. We are not quite as skillful so we hammered in nails after we put everything up, just for extra support. We had to do this process for every 45cm all around the walls, except for where the windows and doors will go. Since we are sloooowwww, (especially since we were still just getting a hang of the circular saw) this step took us about 2-3 days to complete.
Next time, I will talk about how we will make the window frames. Stay tuned :)
0 件のコメント:
コメントを投稿