2009年11月25日水曜日

ご無沙汰 Away


(予想通り)ブログの更新も遅れたまま、私達夫婦はニュージーランドファームステイの旅に出発してしまいました。
ネットがちゃんと繋がる場所にいけば、たまに更新すると思いますが、
とりあえず一月中旬まで、活動休止しちゃいます。
すみません。
キャビン作りの続きを帰ってきたらちゃんと最後まで報告するので、お楽しみに!

Although I am not up to date with the blog, we got so busy at the end and before we knew it, we were on a plane for our long planned trip to New Zealand. We are traveling and staying at farms to learn about that kind of lifestyle, and so far we are having a blast!
We promise to start up where we left off on the cabin building blog when we return in January so don't give up on us!
See you soon and enjoy the holidays!

2009年11月7日土曜日

キッチン Kitchen

私達は二人とも料理が好きだから、キッチンは狭い家でもちゃんとしたのが作りたい。
冷蔵庫も左端に置くから、ドアが右開きするのがいいと大介がかなりこだわって、
ヤフオクでかなり前に中古のをゲットした。買ってもキッチンがまだ出来てないから、
置く場所に困ったけど、水道工事もやった今(水道工事編はダイスケがいつかアップすると言ってます)、キッチン作りを開始できる!

キッチンの並びは大体こんな感じ。


カウンターを作って、あとは、壁の中ごと収納スペースにするという作戦だ。
まずはIKEAでめっちゃ安く買ったキッチンカウンターをカット。

マスキングテープを貼ってから切るときれいに切れると友達が教えてくれた。
シンクが入る部分をジグソーで切って、壁にスッポっと入るようにカウンターの置くも加工する。

こんな感じになります。
それからカウンターを立てる台を作って、カウンターを載せる。

この台はIさんの息子のR君が手伝ってくれた。これでもか!!っていうくらい頑丈に作りました。
これで、料理中にカウンターがぶっ壊れる心配もない :)

メインのキッチンカウンターのほかにも、部屋の左側にもカウンターを作った。
ここはオーブンとか炊飯器とかを置くスペースで、パン作りとか、下ごしらえのスペースにもなる。
キッチンと同じように、頑丈な台を作って、カウンターを載せて終わり。


あとはキッチンの壁の中にシェルフを作り、収納スペースを増やす。
ここには瓶とか、調味料とか、紅茶の缶など、どういうものを収納するかを考えて、
シェルフの高さを調節して作った。下の写真より沢山シェルフを作ったんだけど、
イメージはこんな感じ。
キッチン作りはこれから料理をするスペースとして、いろいろ考えて工夫して、とても楽しい。
早くこのキッチンでいっぱい料理がしたいよーー!

Daisuke and I both enjoy cooking, so making the kitchen was an area I was excited about and
put a lot of thought into. Although since our space is very limited, there wasn't much options in general.
One idea we had that we used was to make as much storage place as possible, so instead of putting a wall up in the kitchen, we decided to use the posts and make shelves out of them. I wanted shelves for jars, cups and other cooking tools so I thought a lot about the size and spacing of the shelves for the kitchen.
As for the kitchen counter, we got a great deal at IKEA for a real big kitchen counter that we cut into two peices for the main kitchen and one counter on the side of the room as well. We cut open a section for the sink, and created a sturdy stand for both counters and that pretty much completed our kitchen.
Daisuke was sure he wanted a fridge that opens from both sides for easy opening, and he bought the kitchen over a month ago, so its been sitting around taking up space. We are glad we can put it where it belongs now:)
We got a gas cooking stove for free from the local warehouse, so now all we need to do is connect our water and gas and we can start'a cookin'!!

2009年11月3日火曜日

壁2 と照明 More Walls and lights

うちみたいに小さな家でも、以外と壁があるもの。リビングの壁、
トイレ、お風呂、廊下の壁。ぜーんぶ何とかせないかん。

まず、リビングを孤立させたいから、キッチンの裏と廊下の部分に
なる壁を作った。ここの木材は近所で仲良くしている人のあまりもの
をもらったので、それを使用。なんと、珍しく切られてバラバラじゃない
木材だからあっと言う間に壁が出来てしまう。


バンバンと打ち込んで、終わり。あー、楽チン。

次はトイレの壁。ここはホームセンターで売っていた(名前忘れちゃった)
和風の紙っぽい、繊維の塗り壁にするから、石膏ボードを張る。
あとはリビングと同様、腰板を入れて、ついでにライトも付けた
(壁塗る時は邪魔で外すのにね)。
石膏ボードの下地処理のパテも忘れずに。

この繊維壁は色々色があったけど、桜っぽいピンクのやつを選んだ。
繊維の中に桜のくずみたいなのが入っててとても可愛いから、塗るのが
とても楽しみ。

塗る前に水(結構いっぱい)混ぜて、少し休ませる。

そして、いざ!ぬりぬりスタート。

以外と難しいけど、コツをつかむと
着々と進み、無心になれるとても楽しい作業。結構肩こるけど。

トイレにはちょっとした収納スペースとして、壁に棚を入れた。
ここも仕上げないと、結局トイレの中が覗かれてしまうな・・・


塗り壁作業にはAiちゃんが手伝ってくれました!ありがとうねー!

あとは乾くのを待って、トイレを入れるだけ。完成の写真は後ほど。

後はお風呂の壁。ここは下地に防水合板を(コンクリート工事とかに
使われるやつ)を壁に打ち込む。

下地の合板を張るのにも、下地が必要という、相変わらずめんどくさいことが多い
(わしは下地が嫌いなのだ・・大事だけど・・)
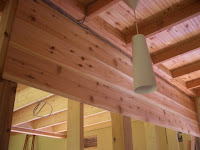
その合板に天井に使った、米杉を打ち込んでいく。相変わらずいい香り。

そんな感じで壁作りで忙しい日々。

他にも照明を次々入れていますよー。ダイニングは私の選んだ、
ちょっとこだわり(安いけど・・・)のライト。

キャビンっぽくっていいでしょー。

We have started to do a lot of work on the inside of the cabin.
Even though its a small cabin, we have quite a few walls to
work on. There's the bathroom walls, toilet walls, hallway
and kitchen walls.

For the kitchen wall, we decided to keep it open
and just use the back of the hallway wall. Later we
will make cupbourds within the walls. The wood we used
for the hallway is wood given to us by a local friend
and it was in nice long peices. So, unlike the wall making
we made previously, which was all in little peices,
this wall was easy easy easy. We were done in just
a few minutes. So, now this must be what it feels to
use materials that aren't chopped in tiny peices.
ah- the ease... I can get used to this.

For the toilet, we used a Japanese paper/fiber mix
wall that you put on the wall like a plaster wall.
I chose the cherry blossom color and it was a lot of
fun to put on. A newly made friend named Ai also came
to help.

For the bathroom, we used water-proof boards that
are generally used in concrete construction. On top
of these boards we used the red-cedar wood peices
we used on the roof. However, there wasn't enough
to do the whole thing, so we have to think about what
we do with the rest.... but we will think about that
later.. haha.

We also put in some more lights. I really like our dining room
light, that has a nice cabin-feel to it with the design of
the leaves. It's kinda like a cheaper version of a tiffani lamp :)