
2009年12月31日木曜日
2009年11月25日水曜日
ご無沙汰 Away

(予想通り)ブログの更新も遅れたまま、私達夫婦はニュージーランドファームステイの旅に出発してしまいました。
ネットがちゃんと繋がる場所にいけば、たまに更新すると思いますが、
とりあえず一月中旬まで、活動休止しちゃいます。
すみません。
キャビン作りの続きを帰ってきたらちゃんと最後まで報告するので、お楽しみに!
Although I am not up to date with the blog, we got so busy at the end and before we knew it, we were on a plane for our long planned trip to New Zealand. We are traveling and staying at farms to learn about that kind of lifestyle, and so far we are having a blast!
We promise to start up where we left off on the cabin building blog when we return in January so don't give up on us!
See you soon and enjoy the holidays!
2009年11月7日土曜日
キッチン Kitchen
私達は二人とも料理が好きだから、キッチンは狭い家でもちゃんとしたのが作りたい。
冷蔵庫も左端に置くから、ドアが右開きするのがいいと大介がかなりこだわって、
ヤフオクでかなり前に中古のをゲットした。買ってもキッチンがまだ出来てないから、
置く場所に困ったけど、水道工事もやった今(水道工事編はダイスケがいつかアップすると言ってます)、キッチン作りを開始できる!
キッチンの並びは大体こんな感じ。

カウンターを作って、あとは、壁の中ごと収納スペースにするという作戦だ。
まずはIKEAでめっちゃ安く買ったキッチンカウンターをカット。

マスキングテープを貼ってから切るときれいに切れると友達が教えてくれた。
シンクが入る部分をジグソーで切って、壁にスッポっと入るようにカウンターの置くも加工する。

こんな感じになります。
それからカウンターを立てる台を作って、カウンターを載せる。


この台はIさんの息子のR君が手伝ってくれた。これでもか!!っていうくらい頑丈に作りました。
これで、料理中にカウンターがぶっ壊れる心配もない :)
メインのキッチンカウンターのほかにも、部屋の左側にもカウンターを作った。
ここはオーブンとか炊飯器とかを置くスペースで、パン作りとか、下ごしらえのスペースにもなる。
キッチンと同じように、頑丈な台を作って、カウンターを載せて終わり。


あとはキッチンの壁の中にシェルフを作り、収納スペースを増やす。
ここには瓶とか、調味料とか、紅茶の缶など、どういうものを収納するかを考えて、
シェルフの高さを調節して作った。下の写真より沢山シェルフを作ったんだけど、
イメージはこんな感じ。

キッチン作りはこれから料理をするスペースとして、いろいろ考えて工夫して、とても楽しい。
早くこのキッチンでいっぱい料理がしたいよーー!
Daisuke and I both enjoy cooking, so making the kitchen was an area I was excited about and
put a lot of thought into. Although since our space is very limited, there wasn't much options in general.
One idea we had that we used was to make as much storage place as possible, so instead of putting a wall up in the kitchen, we decided to use the posts and make shelves out of them. I wanted shelves for jars, cups and other cooking tools so I thought a lot about the size and spacing of the shelves for the kitchen.
As for the kitchen counter, we got a great deal at IKEA for a real big kitchen counter that we cut into two peices for the main kitchen and one counter on the side of the room as well. We cut open a section for the sink, and created a sturdy stand for both counters and that pretty much completed our kitchen.
Daisuke was sure he wanted a fridge that opens from both sides for easy opening, and he bought the kitchen over a month ago, so its been sitting around taking up space. We are glad we can put it where it belongs now:)
We got a gas cooking stove for free from the local warehouse, so now all we need to do is connect our water and gas and we can start'a cookin'!!
2009年11月3日火曜日
壁2 と照明 More Walls and lights
うちみたいに小さな家でも、以外と壁があるもの。リビングの壁、
トイレ、お風呂、廊下の壁。ぜーんぶ何とかせないかん。
まず、リビングを孤立させたいから、キッチンの裏と廊下の部分に
なる壁を作った。ここの木材は近所で仲良くしている人のあまりもの
をもらったので、それを使用。なんと、珍しく切られてバラバラじゃない
木材だからあっと言う間に壁が出来てしまう。


バンバンと打ち込んで、終わり。あー、楽チン。
次はトイレの壁。ここはホームセンターで売っていた(名前忘れちゃった)
和風の紙っぽい、繊維の塗り壁にするから、石膏ボードを張る。
あとはリビングと同様、腰板を入れて、ついでにライトも付けた
(壁塗る時は邪魔で外すのにね)。
石膏ボードの下地処理のパテも忘れずに。
この繊維壁は色々色があったけど、桜っぽいピンクのやつを選んだ。
繊維の中に桜のくずみたいなのが入っててとても可愛いから、塗るのが
とても楽しみ。
塗る前に水(結構いっぱい)混ぜて、少し休ませる。

そして、いざ!ぬりぬりスタート。

以外と難しいけど、コツをつかむと
着々と進み、無心になれるとても楽しい作業。結構肩こるけど。
トイレにはちょっとした収納スペースとして、壁に棚を入れた。
ここも仕上げないと、結局トイレの中が覗かれてしまうな・・・

塗り壁作業にはAiちゃんが手伝ってくれました!ありがとうねー!

あとは乾くのを待って、トイレを入れるだけ。完成の写真は後ほど。
後はお風呂の壁。ここは下地に防水合板を(コンクリート工事とかに
使われるやつ)を壁に打ち込む。

下地の合板を張るのにも、下地が必要という、相変わらずめんどくさいことが多い
(わしは下地が嫌いなのだ・・大事だけど・・)
その合板に天井に使った、米杉を打ち込んでいく。相変わらずいい香り。

そんな感じで壁作りで忙しい日々。
他にも照明を次々入れていますよー。ダイニングは私の選んだ、
ちょっとこだわり(安いけど・・・)のライト。

キャビンっぽくっていいでしょー。
We have started to do a lot of work on the inside of the cabin.
Even though its a small cabin, we have quite a few walls to
work on. There's the bathroom walls, toilet walls, hallway
and kitchen walls.
For the kitchen wall, we decided to keep it open
and just use the back of the hallway wall. Later we
will make cupbourds within the walls. The wood we used
for the hallway is wood given to us by a local friend
and it was in nice long peices. So, unlike the wall making
we made previously, which was all in little peices,
this wall was easy easy easy. We were done in just
a few minutes. So, now this must be what it feels to
use materials that aren't chopped in tiny peices.
ah- the ease... I can get used to this.
For the toilet, we used a Japanese paper/fiber mix
wall that you put on the wall like a plaster wall.
I chose the cherry blossom color and it was a lot of
fun to put on. A newly made friend named Ai also came
to help.
For the bathroom, we used water-proof boards that
are generally used in concrete construction. On top
of these boards we used the red-cedar wood peices
we used on the roof. However, there wasn't enough
to do the whole thing, so we have to think about what
we do with the rest.... but we will think about that
later.. haha.
We also put in some more lights. I really like our dining room
light, that has a nice cabin-feel to it with the design of
the leaves. It's kinda like a cheaper version of a tiffani lamp :)
2009年10月23日金曜日
内装壁 Inside walls
前から漆喰の壁に憧れてるから、内装の壁は漆喰
にすることにした。漆喰は自然な素材からできてるし、
湿気を吸ってくれるし、しかも結構値段も安い。なんとなく
高いものだと思っていたんだけど・・
漆喰や塗り壁類に必要なのは下地。漆喰とか
珪藻土には石膏ボードが下地になる。
全部漆喰で白だと寂しいから、腰板を入れると言うことで、
腰板を同じ太さの太めの石膏ボードを買った。
石膏ボードも意外と安い。でも驚くほど重たい。本当に石みたいな
ものなんだなーと思いながら、泣き泣き運ぶ感じ。
その石膏ボードを壁に打ち込んでいくんだけど、一人支えて、
一人打ち込むから、支えてるほうは本当に泣きたくなるほど重い。
早くして打ち込んでくれ~~~っと心で叫びながら、必死に耐える。
家作りは楽しいけど、なんでこう重い物ばかりなのだろう・・・

所々石膏ボードを加工して、どんどん壁に打ち込んでいく。

一気に断熱材も隠れて、家の中の壁が出来ていくから、満足度は高い。
壁はこれで終わりでもいいかな、って思っちゃうくらい。

次に腰板を打ち込んでいく。
これも下地を打って、長さに切って、ステープルエアーガンで
打ち込んでいくだけなんだけど、私達は
ちょっと下地を適当にやりすぎて、深さがバラバラになっちゃったから、
切ったダンボールでごまかしながらやった。
下地はちゃんとやるべきだね。あとで後悔することが多いから。
腰板を石膏ボードが入るとこんな感じになる。

本当、これだけで内装終わりでいいやと一瞬思ってしまう。

この作業はK太とAnriが手伝いに来てくれた。なにを手伝っているのかは謎だが・・・
I have always liked plastered walls, and wanted to do plaster
inside our cabin. There is a plaster type called shikkui in Japan
that has been used for a long time. It is made of all natural
materials (sea shells and such), absorbs moisture (which is a good
thing around here where its always humid) and is relatively cheap.
Making the whole wall out of plaster is kinda boring so we
decided to have wood up to about the waist and bought the thick
type of plaster board to match the width of the wood.
Plaster board is called sheet rock,and is literally, as heavy
as a board of rock. They look innocent enough,
but when you pick one up, (or try to pick it up)
it feels your arms and back will give out.
Building a cabin is fun, but why does everything have to be so
darn heavy... Carrying the boards were one thing, but holding
them in place while Daisuke screwed them into the wall was
more than any kind of tolerance training I have ever experienced.
Who needs a gym when you can build a house?!
Once the sheet rock was up and we put in the wooden wall peices
the interior looks more and more finished. It looks nice (its
especially nice to have the ugly insulation covered up) so it
makes me think that its as good as done and not bother with it
anymore, I have always wanted to plaster so there are
several good days work left on these walls, I guess.
2009年10月19日月曜日
排水 Grey&Black Water
これはなんでしょう?

でかい蚊取り線香入れではないですよ。
これはトイレの廃棄物入れの便層です。
ここは排水がないから、ドッボン便所で、一応うちは
1カップトイレで水は流れるのにするから、
でかい1000Lのを設備屋さんが持ってきてくれました。
これを入れるから、かなり深くまで穴を掘ります。

すっぽり入りましたね。
これを一回水でいっぱいにして、回りの土を落ち着かせます。
パイプを繋げて土が落ち着いたら、土を戻してふたをして、終わり。
次にトイレの準備。まず床に穴が空きます。

ここにドボンっと落ちていく訳ですね・・
小さい穴を流す時の水を繋げるためです。
排水のパイプを繋げたら、とりあえず便器の準備完了。
次は他の排水の工事。残念ながら、ここは垂れ流しになって
しまうのだ。そのため、ちゃんと植物性だけの石鹸などを
使うように心掛けなければいけない。
またまた排水パイプの入れるように深く穴を掘る。
その穴の中に砂利を入れる。砂利があるほうが水が
ちゃんと地面に浸透するからだと思う。
次にちょくちょく穴が空いてるパイプを入れる。

これも徐々に水が流れるようにするため。
さらにパイプを古いシーツに包む(砂など入らないように)

そして、またその上に砂利を引く。
また土を乗せたら排水工事完了。

単純な作業だけど、ユンボがないと無理だなー。
いつか自分でユンボ操縦できるようになれば
さらにコスト削減できるんだろうなー。
Our cabin is up in the mountains,
and there is no way to connect to sewage here.
First, we had to get a big tank for our black water
sewage. Its that funny looking tank in the pic above.
It's a 1000ltr tank, so should hold for a few months
at least.
We dug a big whole to fit the big tank in, then filled
the tank with water so that it will settle in the ground.
After a few days we connected the tank to a pipe
and covered it with soil. Pretty simple.
Every once in a while, we will call people to suck up
the poopies. fun fun.
Next, the grey water. Since there is no sewage here,
we basically have to drain the water out in the soil.
So, it is very important to use only bio-degradable soaps.
Another deep and long hole was dug behind our cabin
and we layed gravel to help the draining.
Next we put in a holly pipe so the water drains little
by little instead of all in one place.
We covered the pipe with an old sheet to prevent soil
and such from stuffing the holes, and covered it again
with gravel.
That was pretty much all there was to it.
In the future maybe Daisuke and I can learn how to
use those big shovel trucks and do this work ourselves,
since that would save a nice chunk of money...
I plan to plant flowers above this newly dug up soil.
Maybe the grey water will help fertilize them :)
2009年10月13日火曜日
床張り Floor
ちょっと気の早い私達はニトリの家具を見ている時にちょうどいいソファベッドがあったため、購入してしまった。
一応配達日は買った日から1っヶ月後にしてもらったけど、気づいたらもう一ヶ月が過ぎようとしていた。
ソファベッドが届く前にやらなければいけないことがある。それは床張り。ソファベッドが来てからだと、邪魔で仕方がない。そういうわけで、急いで床作りは開始。
床材は結構前からTres Homesのあまりものを安く売ってもらって、家の隅っこで待機させてた。この床材はアメリカの大きいホームセンターで売っている、DIY向けの物で、パーケットと呼ばれている建材。
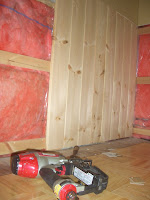
まず、リビングの掃除をして、床のほこりをなるべくきれいにする。用意するのは木工用ボンドと床用釘。友達から借りた、床用釘を打ち込むエアーガンもあるとかなり便利。
次にパーケットをまっすぐ引けるように、炭つぼで部屋の真ん中に線を書いておく。それからパケットをなるべくまっすぐにリビングの真ん中からボンドを付けてから、打ち込んでいく。

この最初のラインをまっすぐにするのがとても重要。でもパーケットのサイズも微妙に違うから、どうしても多少ズレが出てきてしまう。しょうがないっと思ってここでまっすぐに
しなかったのが、あとで後悔することになる。実際わたしたちは後悔した・・・
続いて、真ん中に引いた最初の列から、ピラミッド状にどんどんパーケットをひいていく。この日は大介の両親も手伝いに来てくれたので、4人で作業をした。
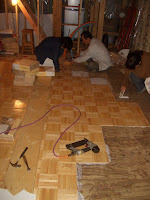
最初の内はいいけど、そのうちどんどん最初のずれのつけが回ってきて、なかなかパーケットが横と下のパレットに収まらなくなっていく。これを叩いて微調節するのがなかなか難しい。そして微調節しても、そのうちどうしてもずれが出てきて、パーケットがと入らなくなる。大介みたいなA型&細かい人には耐え難い作業。
そのうち諦めるしかないんだけどね。
そして床張りに苦戦しながら、途中、なんとパーケットが足りないことに気づく。本当は余るくらいあるはずだという話だったが、なんと計算違いでまったく足りない。
仕方がないので、リビングの4面の隅にパーケットを貼るのは諦めて、足りる分だけ貼ることになった。
空いてしまう部分はあとでなにか対策を考えなければいけない。材料をもうちょっと買うことも、アメリカからかなり前に輸入したもので、もう手に入らないため、できない。
まー、あまり物の材料を使うというのは、こういうことは付き物で、仕方がない。あとでまた工夫して考えよう。
とりあえず完成したのが、下の写真。近くで見ない限りは多少の隙間などわからないので、結構きれいな仕上がりになった。一気に室内の雰囲気がでてきた感じ。
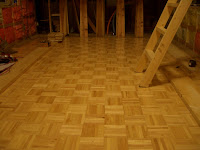
なんとかソファーベッドが届く前に完成できて、一安心。
When we went window shopping for funiture one day, we ran into a sofa bed that was a great price with a nice design and bought it on the spot.
Although we scheduled the delivery date to be one month after we purchased it, that one month was about to pass, and we realized that we had better
get the living room floor done before it arrives, since it would be really hard to work around it later.
We had bought left over materials from Tres Homes for a cheap price some months ahead of time. It was floor material that is sold in Home Depot, and
is pretty DIY friendly. The tricky thing with this material, is that you are supposed to make the first line very straight so all the other peices fit in
nicely later. However, the individual peices are not exactly straight, so after a while, the lines start to get out of wack.
It was fine at first, but after a while we were trying to make the sides fit in, and if we put in one side, the other side came out, etc etc. Eventually,
we had to give up and just let some of the sections of the floor have a slight space between the peices. Hey, maybe when there is a lot of moisture
in the air, it will expand and fit perfectly... (wishful thinking).
We ran into a little trouble when we realized that there actually wasn't enough material to cover the whole living room floor. When we bought the
material, we miscalculated the amount (it was supposed to be more than enough), and we can't purchase anymore since it was imported from the US
probably a while ago. So, we layed the peices out and let the outer rims of the living room bare for now. We will have to think of something to cover it up
but that's just the price you pay when you use left over materials I guess.
With the help of glue and a floor nail gun we borrowed from our friend, and the helping hands of Daisuke's parents, we were able to get the floor done
in time before the sofa bed arrived. With the floor done, the inside of the cabin is beginning to look more and more like a living space instead of a
construction site. Now we have to be more careful that our feet are clean before we walk into the house!!
2009年10月8日木曜日
天井 Ceiling
野路板も乾いてニスを塗ったところ、長さを切って、やっと天井張りがスタート。
一ヶ所やるのに二人がかりでやる。
野路板は時間が経つと乾いて縮んでしまう。そのため、ある程度縮んでもいいように、
2.5cm重ねて天井を張った。

ロフトの部分は大介のお姉さんのみーちゃんが手伝ってくれた。
あと、別の日には麻衣ちゃんと大介の母も一緒にやってくれた。
二人がかりだから、助かった。
最後の日は大介も加わって、3人でやった。やっぱり一人より二人、二人より三人。
人数が多いほうが作業が早いもんですな。

ロフトの部分より、リビングの部分大変だった。
足場を組んで、特に上の部分はかなり高いから、結構怖かった。

他の作業をしながらだったけど、けっこう何日も掛けてやっと完成した。
予想よりカッコよくなって、すごく木の家っぽさがでて、
木の香りも素敵だから、気に入ってます。
こういう作業は終わるとすごく満足感あるけど、
やってる間は一枚一枚、長さが合わなかったり、
釘がすべって落ちたり、節で釘がなかなか入らなかったり、
キツイ体制でハンマーを打ってると、もう、疲れて最後には気合で声を出さないと力が入らないくらい
結構疲れる作業なのだ。
だから終わってよかったーー。

天井が終わって、早速ヤフオクで買ったシーリングファンを取り付けた。
一番上だとファンが横に当たっちゃうから、大介がファンを少し下げた
所に取り付けれるために小細工して、二人で取り付けた。
この作業が一番高いところで、ファンもすごく重くって、
何気に死ぬかと思った・・・・ハハ・・

でもライトアップした瞬間はちょっと感動。
横に当たらない結構ギリギリの所になったけど(地震があったらちょっとやばいかも・・・)

これが全体的の写真。内装もだんだん完成に近づいてきて、ワクワクしてます!

After drying the cedar wood and staining it, we spent many days working on the ceiling.
As I talked about before, this cedar wood is quite wet, and even though
we spent some time drying it, the wood will probably still shrink quite a bit after we put it up.
So, we decided to put one plate over another (2.5cm) to give it some room to shrink without opening up too much space between.
Daisuke's sister helped us out a lot on the loft section and since it takes at least two people to do this work (one person needs to hold the wood into place while one hammers it in) it was a lot of help having her. Maiko and Daisuke's mother helped as well, all on different days.
The loft section is fine since there is a floor, but the living room section required us to work on high up on a pretty limited foot space, so was quite tiring.
In the end, we really like the look of it, and our house smells more of wood than before.
We even added the ceiling fan, which was also very heavy and quite scary to put on.
The ceiling fan would hit the sides of the ceiling, so Daisuke had to make a box that we could connect the ceiling fan/light on so it would lower it a little.
When we did a light up after dark, I must say it was a happy moment.
The insides starting to come together and we are quite excited!
2009年10月5日月曜日
外壁の上の部分 Upper Outer Wall
外壁を全部シーダーシェイク風にするかしないかを悩んでたけど、やっぱりちょっと変えてみようと思った。上の角度の部分を何枚も何枚も切らないといけないと思うと、なんとなくイヤッだったし・・・天井板用に買ったのじ板もステインすると結構カッコいいよとアドバイスをもらって、それを使うことに。
まずはのじ板を図った長さに切って、屋根に合わせて、上の部分は45度に切っておく。本当にステインを塗るとなかなかカッコいい模様が出てくる。

この切った板を事前に下地を打ったところに打ち込む。大きいエリアを一つの板でカバーできるから、やっぱりシェイクより楽だ :)

でもこの作業は高い足場の上でやる。下を見ると結構怖いもの。なるべく下を見ないように、見ないように、一つ一つ打ち込んでいく。

板と板の間から少し中の光とかが漏れちゃうので、間に胴縁という木材も打ち込む。
板を全部並べるとこんな感じ。

完成はこうなりました。うん。カッコいい!

さて、ほんとうのチャレンジは家の反対側。
こっちも窓は半円形になっているから、板を切るのが大変。

とりあえずのじ板は反対の壁のように切っておいた。
そのあと、コンパスみたいなのを(余った木材を長さ調節して、先っちょに鉛筆をテープで付けたもの)
作って、半円形の線を描いた。

そのラインをジグソーできれいに切ることができた。


We finally worked on the upper section of the outer walls.
We weren't sure if we wanted to do cedar-fake all the to this portion of the wall,
and considering that we would have to cut so many of the pieces to fit into the angle of the roof,
we thought it would be easier to do it a different way, and a change in design might make it more interesting.
So, we used to wood that we ordered to make the indoor ceiling, stained and cut it and used that for the outer wall. One of these covers a lot more area than the cedar-fake, so the process was a lot faster and easier. But, we had to stand quite high up, which honestly was kinda scary.
Thankfully, it wasn't a windy day :)
The other side with the half-circle window was a even bigger challenge. We made a compass-like tool to help us draw out the line for round window and cut that with a jigsaw.
All-in-all, we think the wall looks pretty cool, and were glad with the speedy process and the final look of the outer wall. Now, when you drive past our cabin, it looks practically finished from the outside!!
登録:
投稿 (Atom)