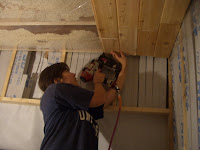
やっと夏のシーズンが終わり、長い夏休みも過ぎ、作業開始しました。やる事が山ほどあって、どこから手を付けるか迷いながら、ちょくちょく進んでます。4つ目の外壁も少しずつ完成に近づいているし、断熱材もちょくちょく入れている。
今日はお風呂の天井の作業を紹介します。お風呂は木のお風呂にこだわった分、やっぱり壁も木がいいと思っていたら、なんとめっちゃクオリティーの高いRed Cedar(米杉、ヒノキ科)の廃材が屋根工事をしてくれたNさんが沢山くれた。これがまたすごーく香りがいいのです。
この廃材も一つ一つ長さが違って、結構短いんだけど、なんとかうまくロフトの床の根太に貼ることができた。
まずお風呂は湿気が多いから、ロフトの根太に防湿シートを貼って、その上に床下カラッと言う乾燥剤を撒いた。これは体と環境に害のないもので、半永久的にもつらしい。

その下からロフトの床を張る時に使った、エアーステープルでバンバン根太に廃材を打ち込んでいく。廃材の間には一応木工用ボンドを塗っておいた。
バラバラの長さを慎重に選んで、ほとんど廃材を切らずにフィットさせることができた。

これで風呂天井完成。とてもいい感じで、ヒノキの香りがなんともいえないくらい最高。

We couldn't do any construction work during the summer season, but now that the season is over we are back to hammering away the outer walls and putting in insulation. The season was fun with all the people (usually there is hardly anyone around). Lots of tennis and golf and swimming in the lake, but toward the end, Daisuke and I were pretty tired of play, and ready to get back to building.
One thing we finished recently is putting up the bathroom ceiling. We used Red Cedar pieces that Mr. N gave us that were left over and sitting in his warehouse. It has a great scent and is the strongest kind of wood you can find against moisture. Japanese wooden baths often use this type of wood, so the scent is very much like a Japanese traditional bath place, which is absolutely awesome.
We put up moisture prevention sheets and a natural moisture observer under the loft floor, and used the air-stapler we borrowed to nail in the little and random pieces of cedar wood. We put a little glue between the pieces to help it stay in place, but we mostly very carefully chose the pieces so that we hardly didn't cut any of the them to make it fit perfectly in the ceiling. The process was very quick (thanks to the air gun) and we couldn't be happier with the way it looks (and smells!)


