ちょっと気の早い私達はニトリの家具を見ている時にちょうどいいソファベッドがあったため、購入してしまった。
一応配達日は買った日から1っヶ月後にしてもらったけど、気づいたらもう一ヶ月が過ぎようとしていた。
ソファベッドが届く前にやらなければいけないことがある。それは床張り。ソファベッドが来てからだと、邪魔で仕方がない。そういうわけで、急いで床作りは開始。
床材は結構前からTres Homesのあまりものを安く売ってもらって、家の隅っこで待機させてた。この床材はアメリカの大きいホームセンターで売っている、DIY向けの物で、パーケットと呼ばれている建材。
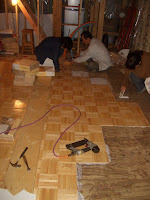
まず、リビングの掃除をして、床のほこりをなるべくきれいにする。用意するのは木工用ボンドと床用釘。友達から借りた、床用釘を打ち込むエアーガンもあるとかなり便利。
次にパーケットをまっすぐ引けるように、炭つぼで部屋の真ん中に線を書いておく。それからパケットをなるべくまっすぐにリビングの真ん中からボンドを付けてから、打ち込んでいく。

この最初のラインをまっすぐにするのがとても重要。でもパーケットのサイズも微妙に違うから、どうしても多少ズレが出てきてしまう。しょうがないっと思ってここでまっすぐに
しなかったのが、あとで後悔することになる。実際わたしたちは後悔した・・・
続いて、真ん中に引いた最初の列から、ピラミッド状にどんどんパーケットをひいていく。この日は大介の両親も手伝いに来てくれたので、4人で作業をした。
最初の内はいいけど、そのうちどんどん最初のずれのつけが回ってきて、なかなかパーケットが横と下のパレットに収まらなくなっていく。これを叩いて微調節するのがなかなか難しい。そして微調節しても、そのうちどうしてもずれが出てきて、パーケットがと入らなくなる。大介みたいなA型&細かい人には耐え難い作業。
そのうち諦めるしかないんだけどね。
そして床張りに苦戦しながら、途中、なんとパーケットが足りないことに気づく。本当は余るくらいあるはずだという話だったが、なんと計算違いでまったく足りない。
仕方がないので、リビングの4面の隅にパーケットを貼るのは諦めて、足りる分だけ貼ることになった。
空いてしまう部分はあとでなにか対策を考えなければいけない。材料をもうちょっと買うことも、アメリカからかなり前に輸入したもので、もう手に入らないため、できない。
まー、あまり物の材料を使うというのは、こういうことは付き物で、仕方がない。あとでまた工夫して考えよう。
とりあえず完成したのが、下の写真。近くで見ない限りは多少の隙間などわからないので、結構きれいな仕上がりになった。一気に室内の雰囲気がでてきた感じ。
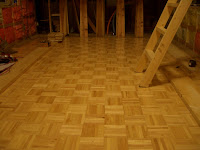
なんとかソファーベッドが届く前に完成できて、一安心。
When we went window shopping for funiture one day, we ran into a sofa bed that was a great price with a nice design and bought it on the spot.
Although we scheduled the delivery date to be one month after we purchased it, that one month was about to pass, and we realized that we had better
get the living room floor done before it arrives, since it would be really hard to work around it later.
We had bought left over materials from Tres Homes for a cheap price some months ahead of time. It was floor material that is sold in Home Depot, and
is pretty DIY friendly. The tricky thing with this material, is that you are supposed to make the first line very straight so all the other peices fit in
nicely later. However, the individual peices are not exactly straight, so after a while, the lines start to get out of wack.
It was fine at first, but after a while we were trying to make the sides fit in, and if we put in one side, the other side came out, etc etc. Eventually,
we had to give up and just let some of the sections of the floor have a slight space between the peices. Hey, maybe when there is a lot of moisture
in the air, it will expand and fit perfectly... (wishful thinking).
We ran into a little trouble when we realized that there actually wasn't enough material to cover the whole living room floor. When we bought the
material, we miscalculated the amount (it was supposed to be more than enough), and we can't purchase anymore since it was imported from the US
probably a while ago. So, we layed the peices out and let the outer rims of the living room bare for now. We will have to think of something to cover it up
but that's just the price you pay when you use left over materials I guess.
With the help of glue and a floor nail gun we borrowed from our friend, and the helping hands of Daisuke's parents, we were able to get the floor done
in time before the sofa bed arrived. With the floor done, the inside of the cabin is beginning to look more and more like a living space instead of a
construction site. Now we have to be more careful that our feet are clean before we walk into the house!!
このコメントは投稿者によって削除されました。
返信削除hey!!! this is amazing... even you had floor already! can't wait to see it myself...miss you guys... and good luck !!
返信削除