2009年5月25日月曜日

骨組が終った後は、足場作りをしなければいけない。屋根屋のNさんが使ってない足場を貸してくれると言ってくれたので、遠慮なくお借りすることにした。
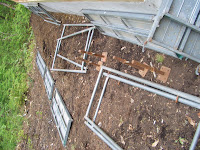
ついでに、余ったヒノキの破材もあるから使っていいと言われて、これもまた遠慮なくもらいました。

まだブログに書いていなかったかもしれないけど、今回のキャビンはなるべく廃材を使って建てようというテーマがある。建築産業からでる廃材の量はかなり半端ない。アメリカではゴミの40%くらいが建築産業からでるゴミから出るというのも読んだ事がある。廃材といっても、けして使えないものでない。ちょっと傷がついたものとか、木材を切ったあとの残る部分とか、単純に余るもの。全部特に問題ないものだけど、基本的に新築する時はみんな新品がいい訳で、小さく余ったものは使うのに手間が掛かるから使わない。もちろん工務店の人たちもこういうものを捨てるのももったいないと思うから、結構倉庫の中に使われないままおいてある。だから、使ってほしいと言ってくれるし、こっちとしてもすごくありがたい話になる。エコの家を建てるというテーマで考えても、ゴミになる物を使うというのは、だれでもできる事だし、一番無駄と無理がない気もする。

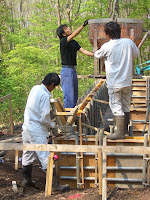
足場を組んだ後は、大工さんたちが屋根の工事を始めて(私も一回屋根に上ったけど、かなり怖かった・・・)私達は筋交いの作業を教えてもらって、それに取り組んだ。写真のように、柱の間に斜めに筋交いを入れていく。これがちょうどはまるように計るには、筋交いを入れる枠の縦と横の高さを測って、その比率で切る角度を決める。
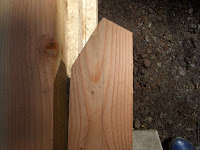
たとえば、230cmと80cmだったら、サジガネ(直角定規)を使って、23cmと8cmを直角に測って8cmのラインを一直線に書いてから、そのラインの真ん中から、また直角にラインを書く。よく分からない説明になちゃったけど、まー実際にやってみないとこういうのは分からんものだ。


ちょうどフィットする(はず)の筋交いを入れて、ビスで固定したら、筋交いを支える間柱を作る。間柱をキャビンの周りの45cm単位で入れていくんだけど、筋交いがあるところには、筋交いが邪魔で入れられない。だから、筋交いが間柱を通るところを切らないといけない。これは単純に間柱を一回入るところまでいれて、筋交いにあたるところを鉛筆で線を書く。その線を筋交いの太さ分切って、これもまたちょうどフィットするようになる(はず)。この間柱の真ん中を丸ノコで切るのがなかなか最初は難しかった。あとは、間柱の上の部分が梁や桁に差し込めるように3cm角の突起状に加工する。
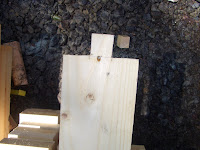
テトリスのようなもんですな。最終的にこんな感じにぜんぶ収まる。


この作業をキャビンの窓や扉が入らない場所全部やるから、3日くらいこの作業に費やした。次の作業は窓枠作り。お楽しみに!

Before moving on with the construction of the walls, we had to put up the footings (not sure what its called officially). This is so we will be able to reach the higher parts of the outer walls as we work. Mr. N, who will be doing our roof kindly let us borrow the parts for the footings and while we were at his warehouse, he also said he has some nice quality wood pieces that can be used for the inside walls. Although they are small pieces, their quality is fine and since he has no use for them, he said we can have it for free. So, of course we piled those in the truck and took it back with us as well. 

Although I haven't mentioned it yet, we are trying to use as much recycled material and/or materials that would otherwise be considered garbage. Lots of materials go to waste in the construction business, not because they are unusable, but simply because they have a slight stain or scratch, or are basically just left over from the construction site. And, of course, since most people don't want their house built from left over material and also because its probably more work than its worth for the construction workers to collect and use left over parts, everything is bought new and in bulk. So, the warehouses of these construction companies are filled with usable materials that they feel bad about throwing out since its usable, but also can't use for their new projects. They are happy that we can get it off their hands, and we are super happy since we get materials for dirt cheap or free. I once read that the amount of garbage that comes from the construction business is about 40% of the total garbage produced in a year in the US. So, if we can make use of these materials that will otherwise just be thrown out, it is both ecological and it keeps our purses happy.

After we put up the footings, the carpenters worked on the roof (I went up on the roof once, and it was quite scary so we will leave that to the professionals) and they taught us how to make the rest of the walls. Like I mentioned before, we are using Japanese style building methods, and with this style, we put in wooden post sideways to fit exactly between the posts to strengthen the walls. Once one goes in sideways, we also put another post in the middle (this kind of post will go up every 45cm of the walls), so the sideways post is now in the way, so we have to measure and cut the middle of the rod, so the sideways one once again fits exactly inside the middle rod. Its kinda hard to explain, but the pictures should make it clearer. The top of the middle rod is cut into a 3cm square and this fits exactly in a hole that was made earlier on top. Technically, everything is supposed to fit snugly together so in the past they didn't have to use nails. We are not quite as skillful so we hammered in nails after we put everything up, just for extra support. We had to do this process for every 45cm all around the walls, except for where the windows and doors will go. Since we are sloooowwww, (especially since we were still just getting a hang of the circular saw) this step took us about 2-3 days to complete.

Next time, I will talk about how we will make the window frames. Stay tuned :)

2009年5月22日金曜日

道具 Tools

(English follows Japanese)
キャビン作りは日に日に進んでいるけど、今日は工事に使っている道具の紹介をしようと思います。まずは丸ノコとゼットソー。

注)危険ですので絶対に真似しないでください。

丸ノコがあれば、大抵の事はできます。着こなしのポイントはいかに重さを感じさせずに片手で扱うかです。間違ってもカットするライン上に体を置いてはいけません。ゼットソーはその名の通り刃の部分がZになっている鋸です。

次に紹介するのは墨つぼ。これ一つあればまっすぐな線を引くことに困ることはありません。

お次は角度を演出するアイテム二点。これだけで持っていると切ない感じになります。

注)危険ですので絶対に真似しないでください。

沢山ビスを打つ場合の必需品、インパクトドライバー。これがないとすべてのネジを締めるのにに数年かかってしまいます。

注)危険ですので絶対に真似しないでください。

次はノミ & ハンマー。ノミは窓枠や間柱を差し込むための隙間を作るのに使います。ハンマーは釘を打ったり、加工した木材を組んだり、その他力ずくでなんやかんや押し込んだりするときに使います。蜂を追い払うために振り回したりもできます。絶対に必要な一品です。腰に下げているだけでおしゃれ度アップ!

注)危険ですので絶対に真似しないでください。

こちらはDekai丸ノコ (正式名称不明)。持ち運びはできませんが、まっすぐに切ったり、角度をつけて切ったり、安定して使えます。

注)危険ですので絶対に真似しないでください。

他にも色々使うけど、作業中はこんな感じに軽いものはベルトに着けてます。袋の中には釘がわんさかです。

最後に弟のジミー君が作った作業台。丸ノコを使う際の必需品。作業台に向かうときは常に笑顔を絶やさず。大工さんなんかはこんなの使わず、至る所で丸ノコ振り回してるけどね (笑)。

こんな感じで色々な道具を駆使して、毎日コツコツと作業を進めてます。次回はさらに進んだ骨組みをアップするので、期待して待っててね!

PS-協力してくれたモデルのために突っ込みのコメントをお待ちしています。(ソフィア)

Today we will quickly introduce the tools we are using. It's really quite self explanatory, basic tools like the circular saw, impact driver, hammer, chisel, and measuring tools all demonstrated in the pictures above on how NOT to use them. The large monster saw was left behind by the friendly carpenters for us to borrow and Jimmy (my little brother) built a sawhorse.

Next time we will post more on the framework that we have been working on for the past few days. Stay tuned!

2009年5月20日水曜日

さて、この数日キャビンの骨組みを組み立てる作業を始めた訳なんですが、毎日やることがいっぱいで、夜にはくたくたに疲れて、ブログどころではない感じです。正直今も筋肉ヘトヘト、まぶたが重いで早く寝たいけど、あまりにもアップしなければいけないことがいっぱいになってきたので、がんばります!

まず、基礎工事が終って、土台も完成して、骨組を組み立てていくんですが、今回はプレカットの木材をオーダーしたので、プラモデルのように届いた木材を組み立てるという体力は必要だけど、作業としては技術はそんなに必要じゃない事から始まります。

材料はこういう風にカットされた状態で届いて、それを順番に建てたり、重ねたりする。


技術があれば、プレカットじゃなくって、ちゃんと柱とか骨組みも自分たちで作ってみたいと思ったけど、技術もまったくないし、初めて丸ノコを使うと言う私達が片っ端から柱作りはさすがに難しすぎるだろうと判断した。ちなみに‘100万円の家作り’と言う本には、こういう柱を切ったり骨組みの作り方など載っていて、お勧めだけど、やはりまったくの素人である私達にはハードルが高すぎる。

いくらプレカットでプラモデルみたいに組み立てればいいと言っても、それでもわからないことばかり。そのため、Tres Homesを通して数日手伝ってくれる大工さんが来てくれた。この大工さんたちと一緒に作業をして、ちゃんとした物を建てると言うのと、経験と勉強のためいろいろ教えてもらうという作戦である。

そして、始まった骨組の作業。それが大工さんの腕も良くって、仕事が早くって、あっと言う間に骨組が終ってしまった。おかげで、写真は撮りそこねたけど、一日目の作業でこんなにもキャビンが形になった。
基礎と土台作りの時は以外と小さく感じたキャビンが、いきなりとても高く、大きく見えて、ちょいとびびった。そして、家が家らしくなっていくその過程の速さにも驚かされる。骨組が終ってからの写真がこれです。

These last few days have been super busy and super productive, and I am tired to the bone. There is so much we did and so much to put up on the blog, but all I want to do is tucker up into bed. But, although my muscles ache, if I get any more behind on this blog, I know I will never catch up, so here is a quick update :)

First, we came back to Nagano and the foundation was complete. The next few days we will be working on the frame of the cabin. We ordered pre-cut wood for this cabin which means that all the materials for the frame will come and all we have to do is put them together like a puzzle. We are building with old-style Japanese architectural techniques and not by 2x4. 2x4 is supposed to be easier, since in a nutshell you make the walls and them lunge them up and add and roof and you are done. Japanese style building involved cutting the tops and bottoms of the wooden logs so that they piece together like a puzzle. Technically speaking no screws and bolts are required, but we (and most all modern buildings) will add screws and bolts for extra support. 
Since we are complete amateurs (its our first time to use a circular saw...), we came to the conclusion that cutting out all the parts on our own was too much to handle from the start. But we wanted to experience the Japanese style building method since there is probably a lot we can learn from it. So, we decided that we would pre-order the wood (as most builders do now) this time. Hopefully, someday we can do this step on our own :)

We hired a couple carpenters through Tres Homes (our contractor) to help us out for the first few days of work so we are not completely lost in the process. They will help us out while we build for frame of the cabin, and we will try to learn as much as we can from them until we are left to work on our own. 

The first day went by so quickly and so much got done, that I missed out on a chance to take pictures, but the picture shows how much of the framework went up with one days work. No wonder everyone uses pre-cut... can't beat modern technology and convenience. We were surprised at how quickly things went, but also at the size of the cabin. It felt small while we made the foundation, but now it seems tall and quite large. I guess we have a lot of work ahead of us! 

2009年5月17日日曜日

土台終了 Finalizing the Foundation

(English follows Japanese)
土台を作る最後の日ははセメントを入れる型の外枠をする作業に取り掛かった。内枠はしっかり固定してあるため、結構外枠の建てつけは簡単にできた。しかも人数が多かったため、かなり早く作業は終わった。最後にYさんが細かい調整をして、やっと型が終わった。


午後からはセメントのトラックとクレーン車が来た。しかもドでかいクレーン車。


まさかこんなでかい物がくるとは思っていなかった。なんかUFOみたいな容器にセメントを入れて、クレーン車で運んで、土台の型で流し入れて行くという作業だ。こんな巨大なクレーン車とかがきて、大掛かりにセメントを運んでいるのを私達はただ安全な所で観察していたけど、さすがに、これのどこがDIYだろう、っとちょっと心の中で思ってしまった。でもここで言い訳をするみたいだけど(実際そうだけど)ちゃんと土台はプロにやってもらうには理由がある。ひとつはもちろん土台は適切に作らないと家全体がゆがんでしまう。多少ゆがんでもいいと思うけど、やっぱり水道工事とかあとで数ミリのずれがあると困る事になるらしいし、窓のサッシを入れたりする時も土台が曲がってると全部曲がった状態で計らないといけなくなる。もうひとつの理由は、今回作ったような全体的にセメントの壁を作るしっかりした土台はもともと作ろうを計画していなかった。この辺りのキャビンを全部そうなんだけど、束石(ツカイシ)の上に木の柱をのせて、家の下が空くような土台はもっと簡単でできるし、材料費もかからないから、安く済む。でもこういう土台は今では(長野では?)建築法で認められていないようで、できないということになってしまった。地震が多い日本には建築法が厳しいのは分かるけど、この辺のキャビンはかなりぼろぼろの土台で建っているいるのに、地震で崩れたキャビンはない。キャビンは犬が耳を掻くくらいで揺れるけど、そんなに問題ないように思える。まー、許可が下りなければ仕方がなかったし、土台がしっかりしていることにこしたことはない。

クレーン車が運んでくるセメントを3人の職人さんたちでそのセメントを型に流し込んでいく。流し込んだセメントをなんか掃除機みたいな道具でセメントが満遍なく流れるように、空気を抜いていく。流し込んでは、クレーン車がさらに運ぶ。この作業を繰り返す。


残念ながら、あたしたちはその日作業が終るまで立会いができなかったけど、この作業が終って、2-3日セメントを乾かしたら、Yさんと私達が時間をかけて作った型を数人が一気にはずして、土台は完成する。

この作業に掛かった日数は10日(休日を除く)。石田さん、Mさん、Yさん、Nさん、セメントのおじ様、そして他にも助けてくれた職人さんたち、みんなありがとうございました!そして、土台と畑を手伝いに来てくれてJimmy, AiとAyako、手伝いにきてくれて、嬉しかった。また来てね。

土台作りに邪魔だっただろう私たちに丁寧にいろいろ教えてもらって、作業に参加させてもらって、本当にありがたかったです。土台がしっかりしているから、キャビンもしっかり作らないと!

After finishing the inside wall of the mold, we worked on the outer. Since the inside is already sturdy, and we had a few extra hands to help out, the outer wall went up quickly. After Mr. Y made the final adjustments, the mold was finished and ready for cement pouring. That afternoon, the cement truck came, and so did a gianormous crane truck. The crane truck carried the cement pouring into the UFO shaped container to where the cement will be poured into the wall. Daisuke and I just stood back and watched from a safe location as these huge trucks did their work. Watching these trucks, somewhere inside we couldn't help but think, 'what is DIY about this?' I had not expected such huge trucks to be involved in this process. If, however, I am allowed to give a few excuses for this un-DIYness, there are a couple. First, we originally wanted to do a more simple foundation. The cabins around here were all built a while ago, and the foundation is simply wooden stalls on cement blocks so the bottom of the foundation is open (good for storing wood). The article I found on Mother Earth news about a simple cabin also had this kind of foundation. It's more simple and costs less since it doesn't require so much cement and work. However, since Japan is an earthquake prone country, and also a very overly careful and strict country, the local building regulations do not allow this kind of foundation for new buildings. It's true that the cabins here shake with simply the dog scraching her ear (and she is a small dog too), but none of the cabins here have collapsed because of an earthquake (and there was a big one around here a few years ago). So, although I think the simple foundation would have sufficed, there is no getting around local regulations, so we accepted that we have to invest in the foundation. The second reason is more obvious and is that we are complete amatuers and we were going to get professional help to do the foundation anyway. It would 
have been nice to do the simple foundation with professionals as a learning experience for future projects, but I guess that can't be helped. The foundation, of course, is the base of the house and a slight unbalance would mean a crooked house, and difficulity in putting in everything from plumbing to windows later on. Although we don't have plans to learn how to operate a monster crane truck in the future, this process was definetely interesting and a learning experience for us.

We couldn't stay for the whole process of pouring in the cement, but after pouring the cement and evenly spreading it out and making sure there is no air inside, the cement was will be left to dry for 2-3 days and then a few people will come and take off the mold and the foundation will be complete. The foundation process took about 10 days total (excluding holidays). We would like to thank Mr. Ishida, Mr. M, Mr.Y and all the other workers for all their hard work and patience with working with us. Also, thank you Jimmy, Ai and Ayako for coming up and lending a helping hand, we hope to have you come over again soon:). 

Now that we have a beautiful and strong foundation, we can look forward to building our wonderful cabin!!

Extra: Flowers near our Cabin 野尻の近くの飯山で菜の花祭り


2009年5月14日木曜日

型 Mold

セメントも天気がいいからすぐに乾いて、次の日からは土台の壁になるところの型を作り続けた。
鉄筋の部分に前日大介がマスターしたワイヤーでグルグル技で、コンクリートを入れた時に頑丈になるため、さらに鉄筋をクロスして繋げていった。言葉では説明しにくいから写真をどうぞ。


鉄筋のフェンス作る感じ?
その後は型の外枠になる板が届いて、それの手入れをした。前に使われた時に空いた穴にプラスチックの部品をカナヅチで打ち込んで埋めていった。


この板を鉄筋フェンスの周りに沿って型を作っていく。この作業は細かく図ったり、まっすぐしたりといろいろと細かい作業で、やっぱりあとでセメントが入る型な訳で
すから、プロの手と判断が必要で、時間をかけてYさんが数日にわたって作業をしてくれた。

内側の枠が終わったら、先日私たちは繋げたプラスチック(コンクリの壁の中に入るやつ)と壁を頑丈にするための鉄棒を当てるパーツを木の板に穴を開けて、繋げていった。


この作業は友達のAちゃんに手伝ってくれて、彼女が一番インパクトドライバーを使いこなしていた。お見事でしたよ、Aちゃん!

最終的に内側の壁を全部固定したあとはこんな感じになった。
これがかなり頑丈で縦のパイプと横のパイプと板でがっちり固定する事で、壁の線がピキ!とまっすぐになって、コンクリの型が出来上がってくる。最後にまっすぐになるのは、やっぱりYさんの地道な作業のおかげ。ありがとうございました!

The cement dried and hardened quickly thanks to great weather and we continued to work on making the mold for the foundation. We added more steel rods to the existing ones with the wire wrapping technique that Daisuke mastered a few days back. We created a fence like shape with the steel rods to where the foundation's cement walls will go up; this will help the walls be more sturdy. After that they brought in wood boards that will be used to create the inner and outer mold. We hammered in little plastic peices into the holes of the boards so the concrete won't sweep out later. After that, the task of putting up the walls were mostly done by the Mr. Y, since it requires accurate measuring (we dont want slanted cement walls, or we will have a slanted cabin). The next couple days were spent with Mr. Y doing a lot of measuring and adjusting, and after the inner walls were up, we were able to help out with toughening up the walls by screwing in the inner medal peices (that we put together earlier) and putting up steel pipes and wooden sticks along to walls. This made a big difference and after all the support was up, the mold walls were as straight as the strings were put up initially. All thanks for Mr. Y's detailed work. We can actually see how high the foundation will be, and its become easier to visualize the cabin day be day.

2009年5月12日火曜日

セメント Cement

次の日は生セメントトラックが来て、一輪で生コンを運んで鉄筋を刺したところにドバン落としていった。これが、運ぶのはいいんだけど、下ろす時が重くって、ちょっと凹んでいるところで一輪ごと落とさないようにしても、重くって、ドッシャーンっと何回か鉄筋に突撃してしまった。おかげで、運び終わったらころには何個の鉄筋が曲がってしまってた。特に問題にならないみたいだったけど(なにも言われなかったから・・・呆れてるだけだったかもしれないけど・・)。
生コンを運んだあと、鉄筋の周りにきれいに引いていった。この時のコツはセメントを力入れて押さないで、優しく撫でるように平らにしていくと石田さんが教えてくれた。優しく撫でてくうちに凸凹の表面も綺麗な平らになり、意外とちゃんとした出来上がりになった。
この日は弟も手伝ってくれて、石田さんも応援にきてくれたので結構あっと言う間に作業が進んだ。しょうもない素人でも人数がいれば、案外ちゃんとできるもんだな、と石田さんも言ってくれて、私たちもとてもうれしかった。

午後は今後土台の壁になる部分に使うパーツを繋げる作業をした。これからは土台の壁用の型を作っていくらしい。その型の外枠の板を二つ繋げるパーツで、白い部分の外に板を打って、その中に生コンを埋めていく。楽しみだ。

We continued work on the foundation today. A cement truck came in the morning and we carried the cement from the truck to where we layed the steel rods using a wheelbarrel. Its not so hard pushing the wheelbarrel, but when dumping the cement to the desired location, there were areas that there was a sudden hill, and it the wheelbarrel was so heavy that it was difficult to keep it from falling into the steel rods. By the time we finished, quite of few of the steel rods had fallen victim to our clumsiness. But it didnt seem to be a big problem, and we were able to bend most of them back into place. 
After carrying all the cement, we spread out the cement between the rods. The key here, we were told, was to not press down on the cement, but gently spread it by moving the spreading tool back and forth. Eventually the rough surface becomes nice and smooth. My little brother helped out today so we had many hands working. Mr. Ishida was impressed that even though we are all hopeless amatures, if all of us work together, the end result is not so bad. In the end, we put together parts for the mold that we will make to build the cement walls for the foundation. More to look forward to :)


2009年5月8日金曜日

砂利 Gravel

この日は全体的に土を広げて平らにする作業から始まった。
石田工務店から砂利がトラック3台(4台だったかも・・)分来て、全体的に広めた土の土台の壁や、トイレやお風呂になる部分の上に砂利を圧縮させていった。
これは壁の下やキッチン、お風呂などはただの部屋より重いから地面があとで動かないように、しっかりと固めるための作業。野尻に土は真っ黒黒でふわふわ。スリッパー履いてると靴下が真っ黒になっちゃって、なかなか色が落ちない。これはここの土は黒姫の火山灰だからなんだって。なるほどだよね。
全体的に砂利を引いてから、壁になる場所(下に土台のセメントがしっかり入る部分)に25cm単位で鉄筋を砂利の中に打ち込んでいった。これが以外とまっすぐ鉄筋を打ち込むのが難しい。あと、金槌も重いの使うほうがちゃんと打ち込めるんだけど、これはこれで重くって腕がかなり疲れた。
でも全部の鉄筋が打ちまれたら、キャビンの部屋の形とかがはっきり見えてきた。ここが廊下でー、ここがお風呂でーってなんとかなく昔砂場でお家ごっこした時の気分になった。(ちなみに大ちゃんが立っている所が廊下)。鉄筋が全部立った後は、長い鉄筋を周りに引いて、ワイヤーで立ってる鉄筋に繋げた。このワイヤーを付けため専用の道具があって、大ちゃんが結構途中から上手になってた。巻いてくるくる。でもこれをやるだけで鉄筋が結構安定した。
この日はとりあえずここまで。また一つキャビンの形が出てきた。

This day we started by completely flattening out the earth below the foundation. For the areas that will be under the main four walls and the walls of the small rooms (like bathroom and toilet) they brought in 3(or 4) trucks worth of gravel. Since the soil here is very soft, laying the gravel and pressing it down helps to stabilize the earth so the foundation doesn't move later. The soil in Nojiri is probably the blackest soil I have ever seen and is also very soft. The contractor told us that the black top soil is from an eruption, from who knows how long ago, of the Kurohime volcano nearby. No wonder the soil here is so rich.
After laying out all the gravel, we hammered in steel rods around the areas where all the walls will go. This is where we will later lay down the cement walls. Putting in these steel rods clearly pointed out the size of the cabin and where all the rooms will go. After we put them in, I felt like a kid in a sandbox after playing house and deciding where all the rooms are. Daisuke is standing in the section of the cabin that will be the hallway to go to the bathroom and toilet. Lastly, we layed down more steel rods on the ground and connected them to the standing rods with wire. This really helped stabilize the rods into place. Daisuke became quite skilled in putting the wire on with the specialized tool :)

2009年5月1日金曜日

小休止 Short Break


28日はカレンダー通りお休みで、二人で野尻湖を一周(約18キロ、歩き終わってから知ったんだけど)歩くことにした。天気もとても良くって、この数日間のなかで一番暖かくって気持ちいいハイキングができた。
(違和感ある看板発見)
歩きながら、湖でわかさぎを網で釣ってる人がいたり、山菜取りしている人がいて、こういう所は自然が食べるものをいっぱい提供してくれて、素敵な場所だと実感した。そして、せっかくだから自分たちも山菜を探した。タラの目は途中で教えてもらったから分かったけど、他はなにが食べれるのか分からないから、だんだんなんでも食べれる物に見えてきた。そして湖半分くらい歩いたところに、山菜おじさまに出会った。近くのりんご畑の百姓をしている人で、車いっぱい山菜を積んでいた。そして私たちが取った間違った山菜をポイっと捨てて、正しい山菜の選び方を教えてくれた。その上、沢山おじ様の取った山菜を分けてもらった。それからは、ちゃんとした山菜取りができて、その夜は山菜たっぷりに山菜天丼を作った。
山菜の種類はコシアブラ、コゴミ、タラノメ、フキノトウ、タンポポ、アケビ、あとよく分からない葉っぱ。これがもう、驚くほど美味しくって、二人で感動しながら、あっと言う間に完食しました。
Today was a day off and we decided to walk around the lake. It is about a 5 hour hike (18km) and the weather was perfect for a nice hike. While walking, we met people who were collecting edible plants from the forest. Spring is a big season to collect edible plants, and there are many types that can be found in most forests for Japan. People collect them and later fry and make them into Tempura. It is a seasonal delicacy and a welcomed treat after the long winter. We decided to try to collect some ourselves, but didn’t really know what to look for. About half way through the hike, we met a friendly man who told us all about how to look for the plants and the different varieties. His car was filled with him and his friend’s collection, and they shared some with us to take home. That night, we feasted on the fresh plants by making tempura-don, (tempura on rice). The fried plants were surprisingly tasty, and not at all bitter like we had imagined. We couldn’t be happier with the hike and dinner; both more satisfying than anything money can buy.